Pixpa allows you to connect to WHCC lab for the auto fulfillment of your Client Galleries orders.
Don’t have a WHCC account? Create your WHCC account (You need to have an address in the U.S.A. in case you are getting the prints delivered to your studio).
Also See: Setup WHCC lab for auto fulfillment.
In this article:
- Add a WHCC price list
- Manage WHCC price list
- Add/Remove WHCC products from the price list
- Apply a bulk price markup
- Supported WHCC Product list and recommended sizes
Add a WHCC Price List
Once you connect the WHCC account, you need to create a WHCC price list.
- From the Client Galleries (1) section, open Price Lists (2) tab.
- Click on + Add Price List (3) section.
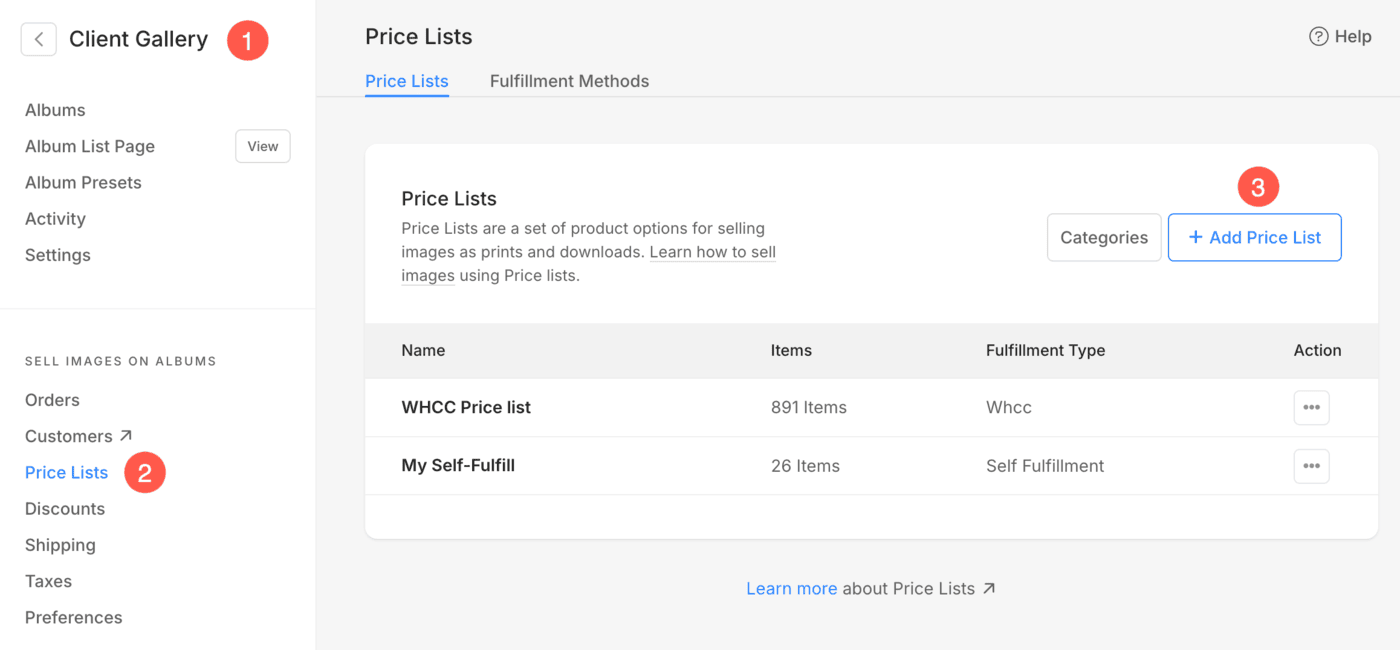
You will see a pop-up where you need to add price list details like:
- Add your price list name like “WHCC price list” etc.
- Choose WHCC here to process all orders by WHCC lab from the dropdown list.
- Check this to include common WHCC products in your price list.
- Finally, Save the changes.
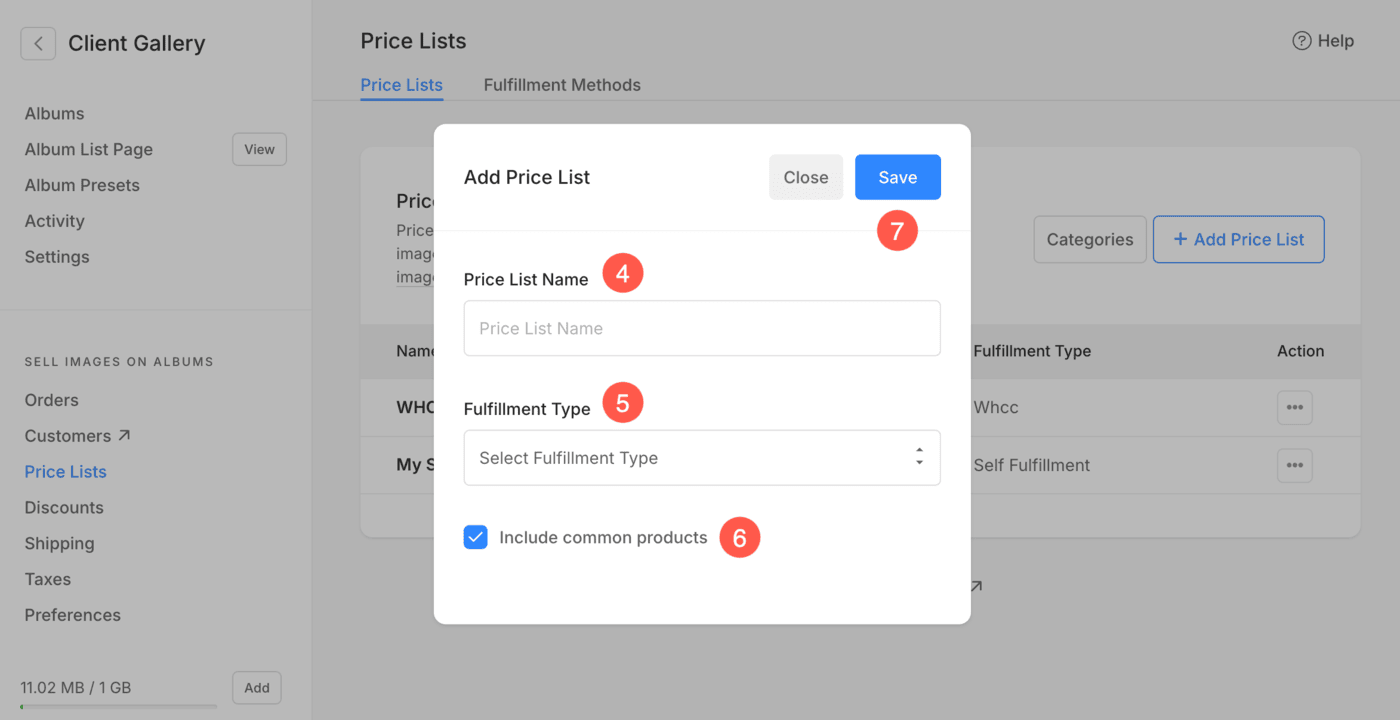
After saving the changes, you will see your newly added WHCC price list. From here, you can manage the following:
- Edit the name of Pricelist
- Duplicate the Pricelist
- Delete the Pricelist

Manage WHCC price list
From here, you can manage the following:
- Add options to WHCC products
- View WHCC product options
- Sequence categories
- Add items to pricelist
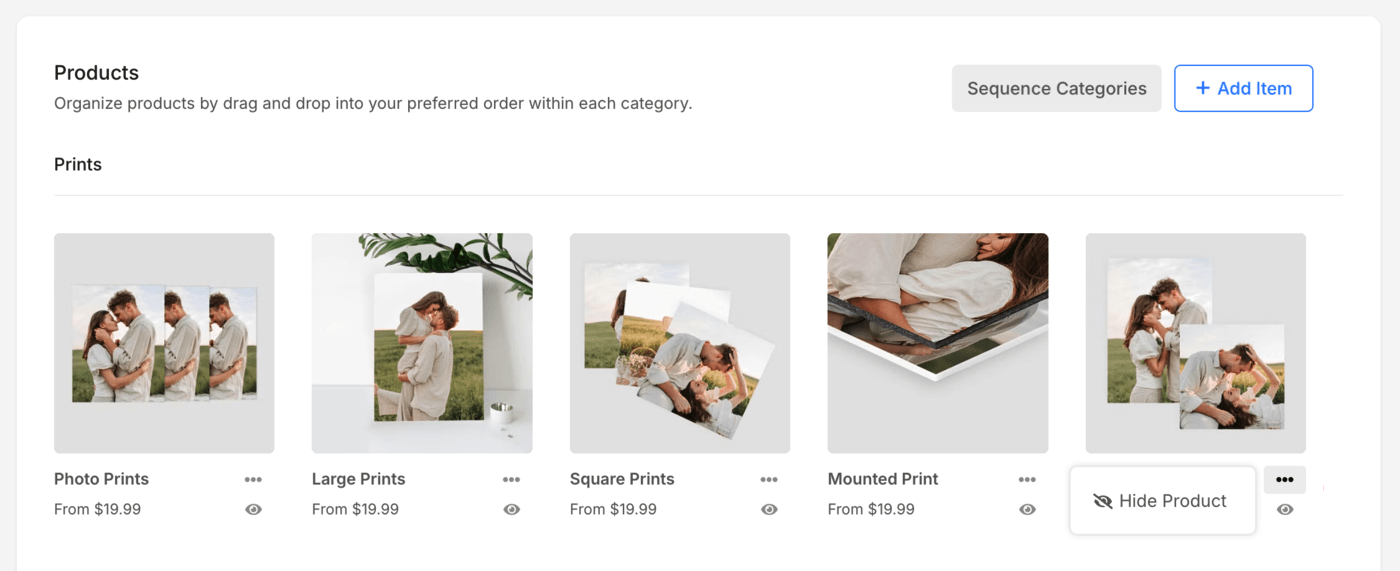
- Hide products from pricelist
Add options to WHCC products
To add options to a WHCC product, click on the particular product.
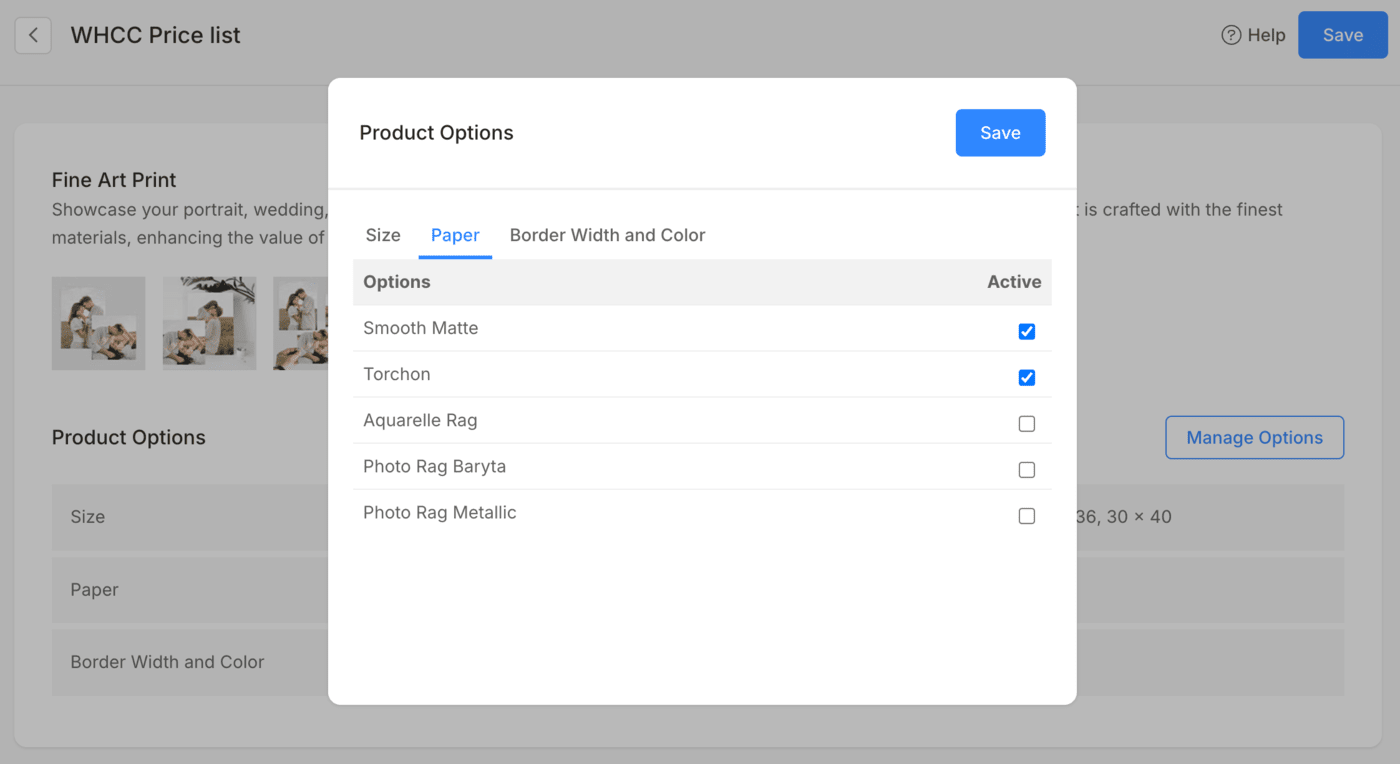
- Here you will see the available product options (like size, paper, border, frame and other options) and their respective enabled options.
- Clicking the Manage Options button will open a pop-up, allowing you to select or deselect various product options for that specific product.

For each individual product, you can add product options by opening it and clicking on the Manage Options button.
View WHCC Product options
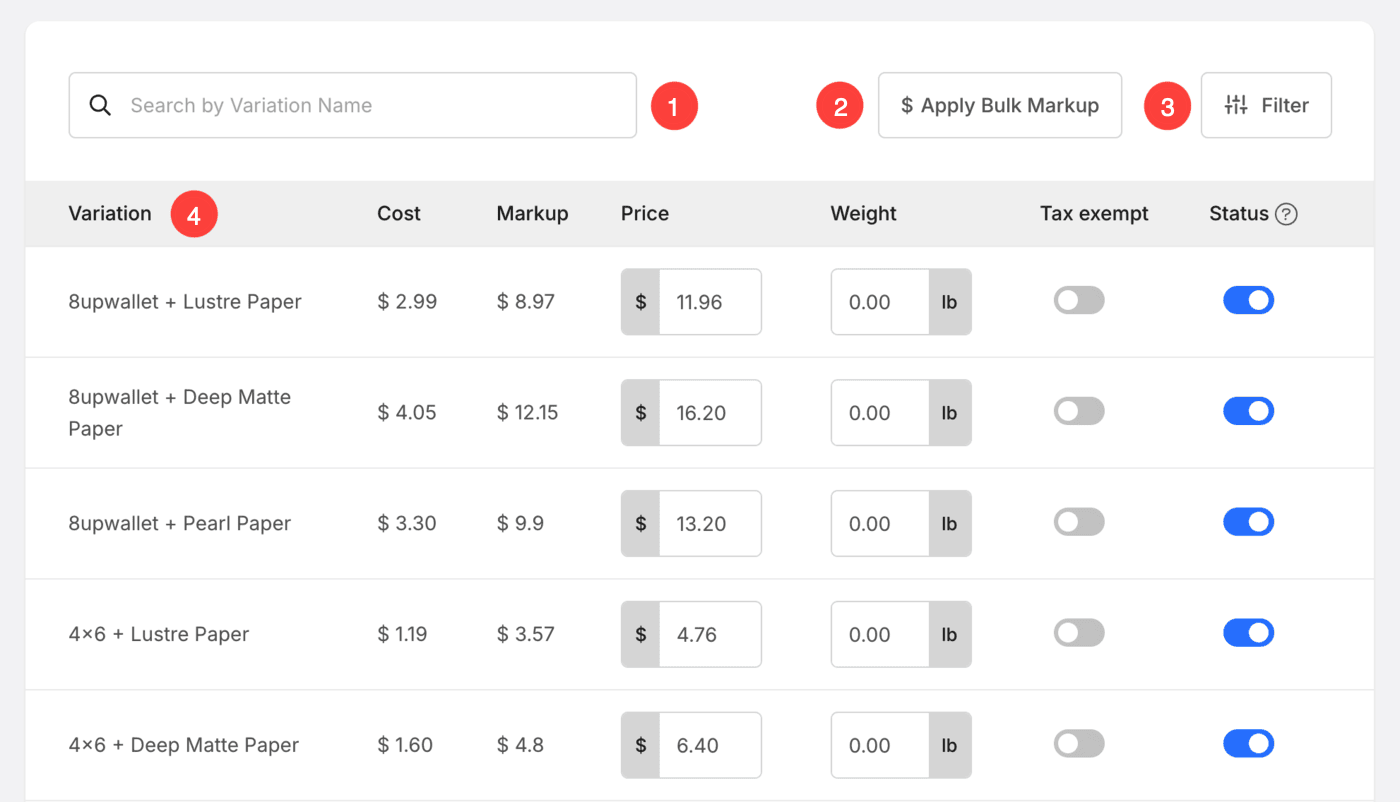
- Search the product option using the Search field.
- Apply Bulk Markup to all the product options of the particular product. Know more.
- Filter the product options using Size and paper options.
- Here, you will see the list of all the product options inside the particular product. You can edit the pricing, weight, tax exemption and enable / disable the options.
Sequence pricelist categories
- Click on the Sequence Categories (1) button.
- A popup will open where you will see the list of all the categories under the price list.
- Click and hold (2) on the category that you want to move. This will highlight the item and make it ready for dragging.
- Drag the category to the desired position. Release the mouse button to drop the item to its new position.
- Click on Close (3) button to save the changes.

Click here to know more about Pricelist categories.
Add item to the price list
Click on the respective WHCC price list to add items to it. You can add two types of items by clicking on the + Add Item (1) button.
- Add Self Fulfillment Items (2) to the price list
- Add Image Download (3) item to the price list

Add Self Fulfillment Items to the price list
On clicking on the Self-fulfillment products option, you will see a popup window where you can add:
- Item Title – The name of your product.
- Price – The default price of your product.
- Category – You can group your products into various categories. Like all print sizes will come in the print category & canvas sizes will come in the canvas category.
Also See: Add a Category in the Client Galleries. - This product is Tax-exempt – Check this option to remove/exempt tax on this particular product.

- Specify Print Size – Choose whether to enable users to specify the image crop area for printing. If it’s not a print product, just select No.
In this case, there will be no crop on the cart page. - Print Width – Specify the width of the product (in inches).
- Print Height – Specify the height of the print product here. On the basis of the specified size, the system would generate a crop on your image.
The user would be able to move the crop and select the required area that should be printed if the crop is smaller than the actual image. - Weight – Specify the weight of the product. See how to change the unit of weight.
- Description – Add your product description. It would reflect on clicking on the information icon next to the product name on the cart page.
- Save – Click here to save the product.

Add Image Download Items to the price list
You can sell download-ready digital files (music, software, video, etc). For adding a digital product, you need to specify the below information:
- What will the customer download? You can allow your customer to download or buy either a single image one by one or a complete gallery in one go.
- Download size: You can allow your customer to download or buy various versions of your original images like large 2048px, medium 1200px, and small 400px.

- Item Title: The name of your product.
- Price: The default price of your product.
- This product is Tax-exempt: Check in this option to remove/eliminate the tax on this particular product.
- Description: Add your product description. It would reflect on the cart page on hovering over the product name.
- Save: Click here to save the product.

Hide product from the category
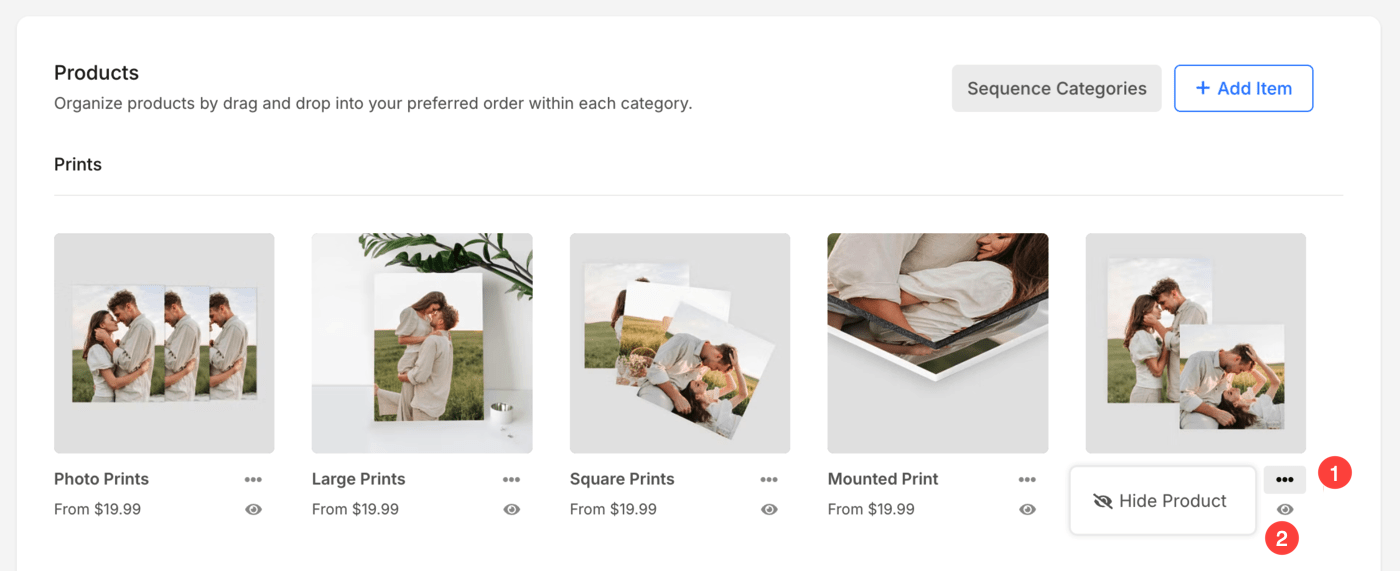
- Click on the three-dot icon.
- A popup will come up from where you can hide the product.
Apply Markup to the WHCC price list
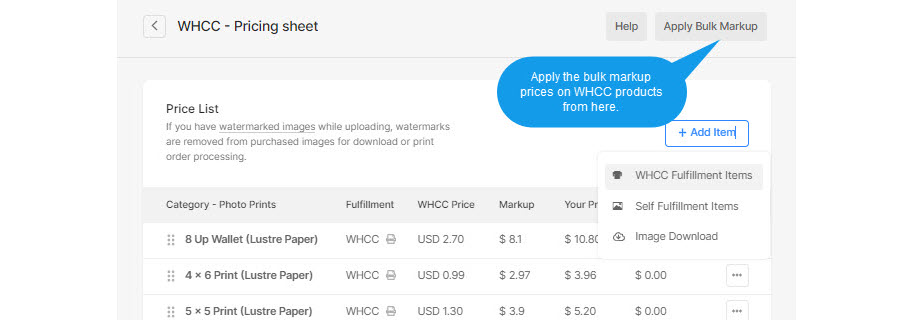
- You can add your profit markup on default WHCC product pricing.
- Click on Apply Bulk Markup button in the price list.
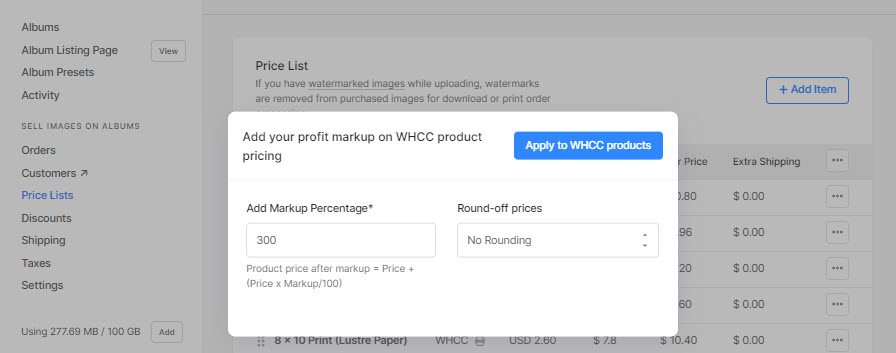
- In the next step, You would see a pop-up window, add your markup percentage here like 200, 300, etc.
- You may also round-off the final product prices like round-off to .99 or .00. Final product prices would be 405.99, 463.99, or 405.00, 463.00 respectively. You may also leave as it is by selecting nothing.
- Then hit the apply button to save your markup on all the products. That’s it.
The final product price will be calculated as:
WHCC Product list and recommended sizes
Pixpa allows you to add Lustre Prints, Deep Matte Prints, Gallery Wraps Canvas, and Metal Prints in various sizes at the moment. Here is the list of products in which you can sell your images with WHCC auto fulfillment.
Photographic Prints on Lustre paper: Know more
- 8up Wallet (2.5×3.5″) – 750 x 1050 pixels
- 4 x 6 Print – 1200 x 1800 pixels
- 5 x 5 Print – 1500 x 1500 pixels
- 5 x 7 Print – 1500 x 2100 pixels
- 8 x 10 Print – 2400 x 3000 pixels
- 8 x 12 Print – 2400 x 3600 pixels
- 10 x 10 Print – 3000 x 3000 pixels
- 11 x 14 Print – 3300 x 4200 pixels
- 12 x 12 Print – 3600 x 3600 pixels
- 12 x 18 Print – 3600 x 5400 pixels
- 16 x 20 Print – 4800 x 6000 pixels
- 16 x 24 Print – 4800 x 7200 pixels
- 20 x 20 Print – 6000 x 6000 pixels
- 20 x 30 Print – 6000 x 9000 pixels
- 24 x 30 Print – 7200 x 9000 pixels
- 24 x 36 Print – 7200 x 10800 pixels
- 30 x 40 Print – 9000 x 12000 pixels
Photographic Prints on Deep Matte paper: Know more
- 8up Wallet (2.5×3.5″) – 750 x 1050 pixels
- 4 x 6 Print – 1200 x 1800 pixels
- 5 x 5 Print – 1500 x 1500 pixels
- 5 x 7 Print – 1500 x 2100 pixels
- 8 x 10 Print – 2400 x 3000 pixels
- 8 x 12 Print – 2400 x 3600 pixels
- 10 x 10 Print – 3000 x 3000 pixels
- 11 x 14 Print – 3300 x 4200 pixels
- 12 x 12 Print – 3600 x 3600 pixels
- 12 x 18 Print – 3600 x 5400 pixels
- 16 x 20 Print – 4800 x 6000 pixels
- 16 x 24 Print – 4800 x 7200 pixels
- 20 x 20 Print – 6000 x 6000 pixels
- 20 x 30 Print – 6000 x 9000 pixels
- 24 x 30 Print – 7200 x 9000 pixels
- 24 x 36 Print – 7200 x 10800 pixels
- 30 x 40 Print – 9000 x 12000 pixels
Premium Fine Art Gallery Wraps: Know more
- 8up Wallet (2.5×3.5″) – 750 x 1050 pixels
- 4 x 6 Print – 1200 x 1800 pixels
- 5 x 5 Print – 1500 x 1500 pixels
- 5 x 7 Print – 1500 x 2100 pixels
- 8 x 10 Print – 2400 x 3000 pixels
- 8 x 12 Print – 2400 x 3600 pixels
- 10 x 10 Print – 3000 x 3000 pixels
- 11 x 14 Print – 3300 x 4200 pixels
- 12 x 12 Print – 3600 x 3600 pixels
- 12 x 18 Print – 3600 x 5400 pixels
- 16 x 20 Print – 4800 x 6000 pixels
- 16 x 24 Print – 4800 x 7200 pixels
- 20 x 20 Print – 6000 x 6000 pixels
- 20 x 30 Print – 6000 x 9000 pixels
- 24 x 30 Print – 7200 x 9000 pixels
- 24 x 36 Print – 7200 x 10800 pixels
- 30 x 40 Print – 9000 x 12000 pixels
Metal Prints only: Know more
- 8 x 10 Metal Print – 2400 x 3000 pixels
- 8 x 12 Metal Print – 2400 x 3600 pixels
- 10 x 10 Metal Print – 3000 x 3000 pixels
- 11 x 14 Metal Print – 3300 x 4200 pixels
- 12 x 12 Metal Print – 3600 x 3600 pixels
- 12 x 18 Metal Print – 3600 x 5400 pixels
- 16 x 20 Metal Print – 4800 x 6000 pixels
- 16 x 24 Metal Print – 4800 x 7200 pixels
- 20 x 20 Metal Print – 6000 x 6000 pixels
- 20 x 30 Metal Print – 6000 x 9000 pixels
- 24 x 30 Metal Print – 7200 x 9000 pixels
- 24 x 36 Metal Print – 7200 x 10800 pixels
- 30 x 40 Metal Print – 9000 x 12000 pixels
