Pixpa allows you to add a marketing popup that enhances your visitors’ experience and is an incredibly effective marketing tool when used in a thoughtful and targeted way.
They help you highlight relevant offers, products, sales, build email lists, and recapture your visitors’ attention before they leave the page.
In this article:
- Add Marketing Popup
- Popup Basics
- Manage Popup Settings
- Manage Popup Design
- Manage Popup Content
- Export Emails
Add a Marketing Pop-up
- Enter Marketing popup (1) in the Search Bar.
- From the related results, click on the Marketing Popups option (2) under Studio Links.

- You will now reach the Marketing Popups (3) page.
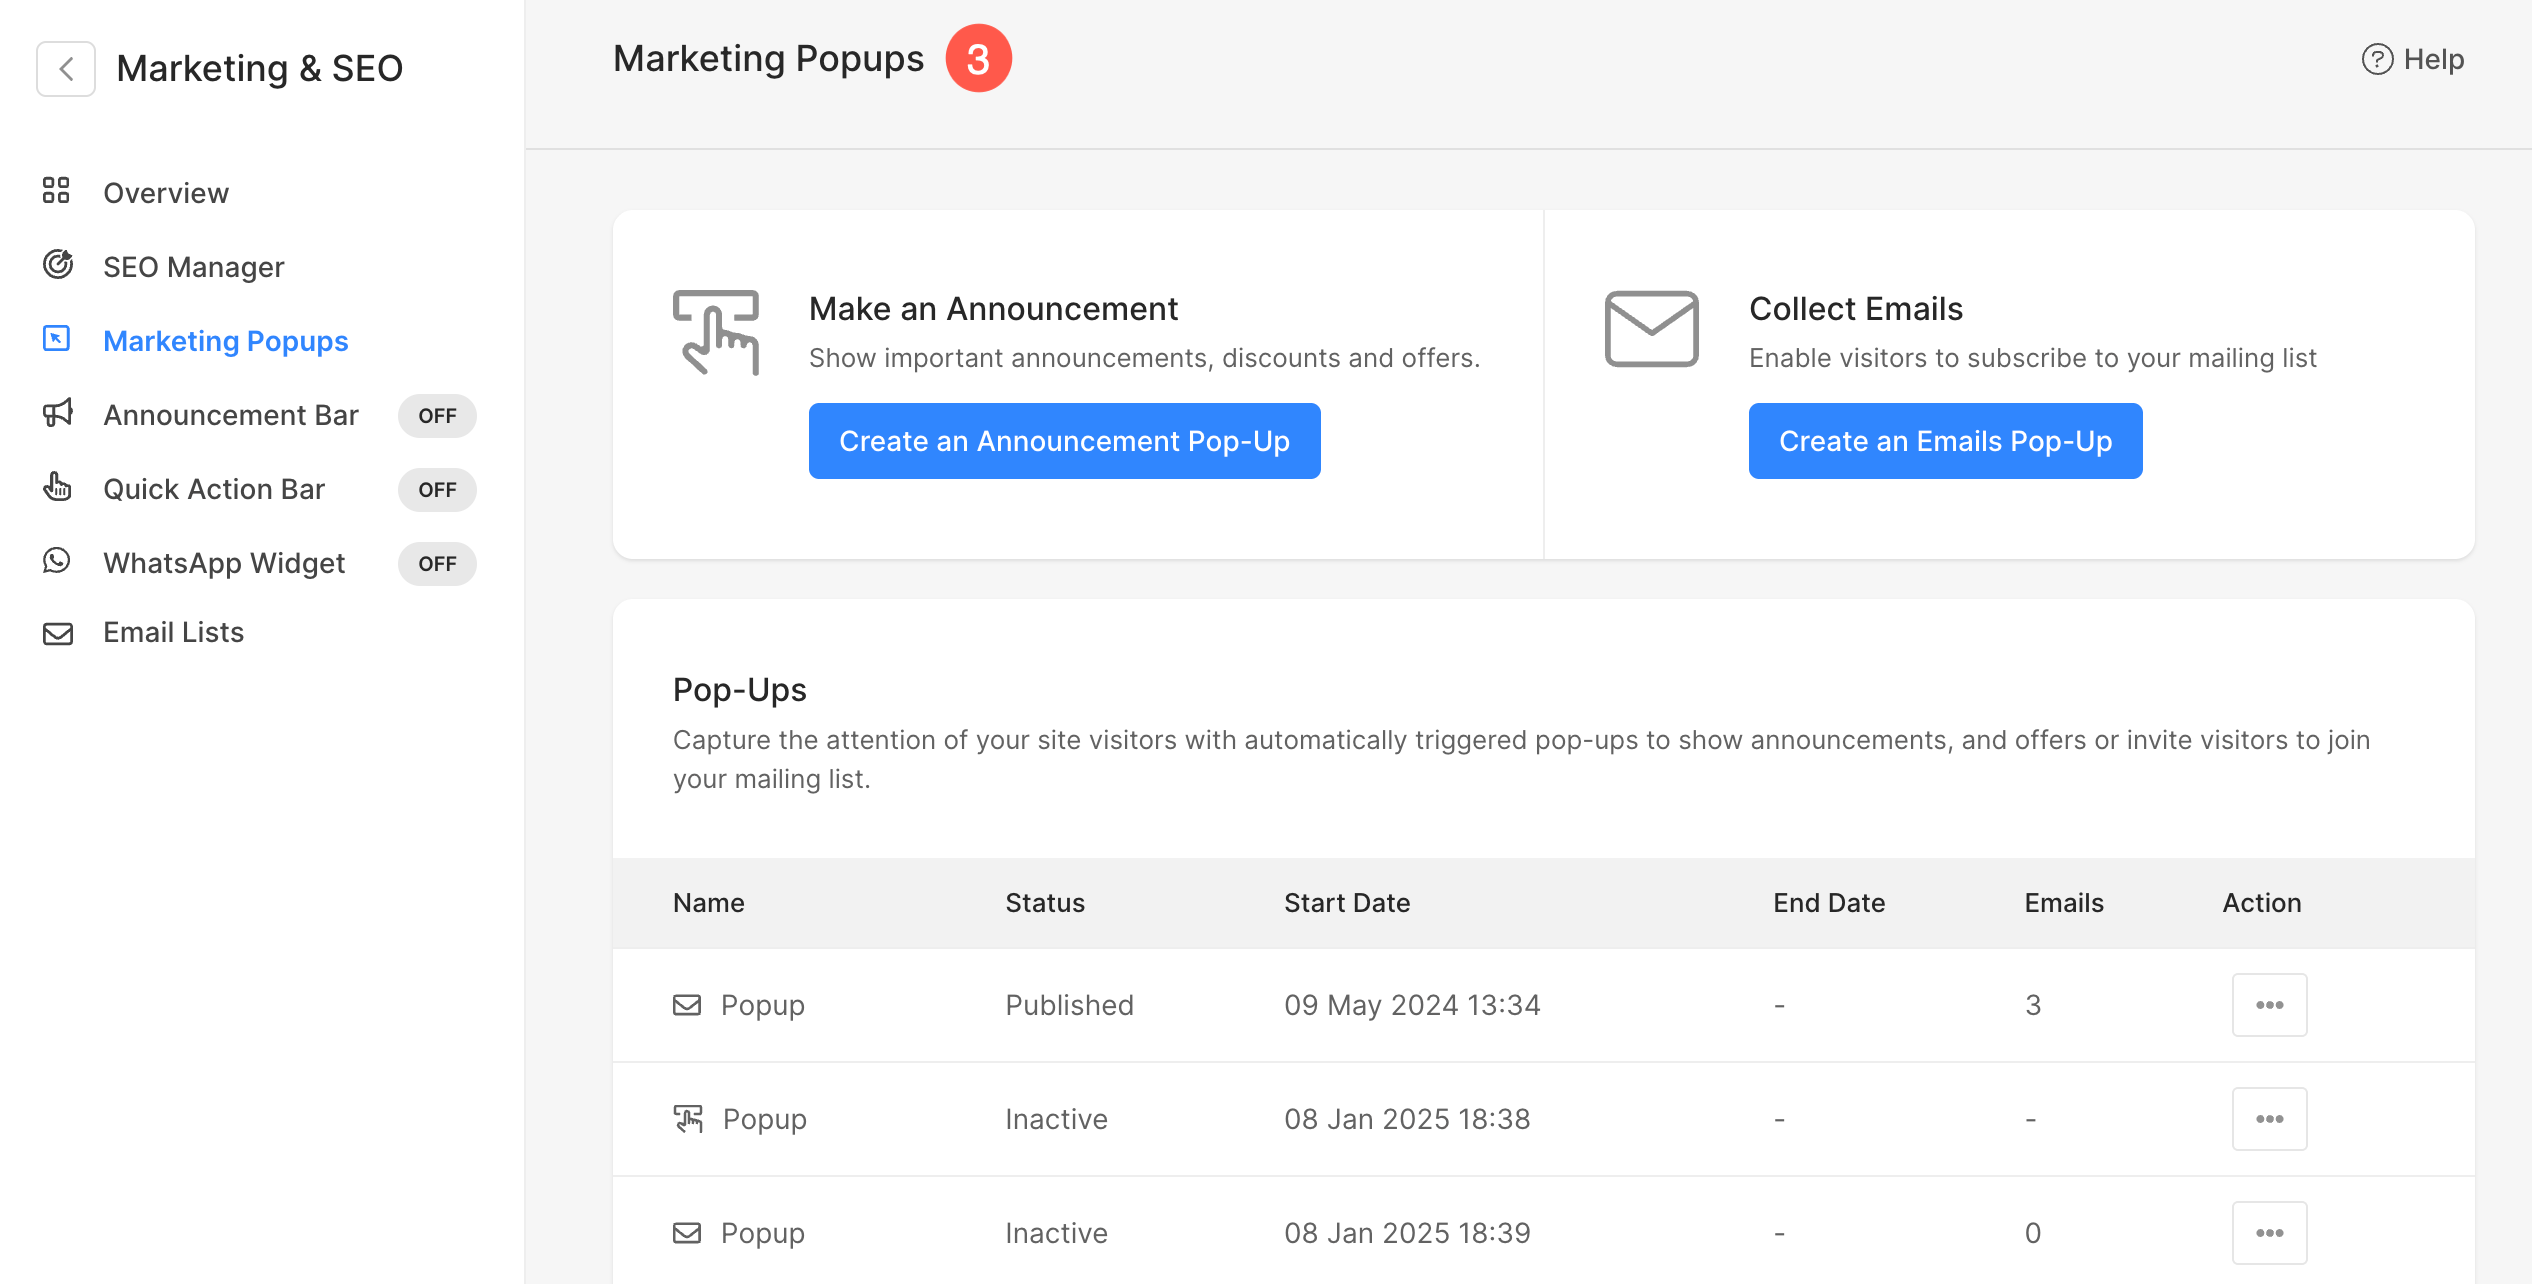
- On the right-hand side, you will have the option to manage the marketing popups.
- Choose to add a new Announcement pop-up (1) or an Emails pop-up (2).

Popup Basics
Once you choose the popup option you want to add, it will open the popup editing panel.
- Check the popup type you are working on.
- Manage the settings of the popup.
- Design your popup like the layout, featured image, color, and font style.
- Specify the content of the popup.
- View the popup on the live website.
- Save the popup.
- Preview of the popup you are working on.

Manage Popup Settings
The settings of the Email Popup and Announcement Popup are the same.
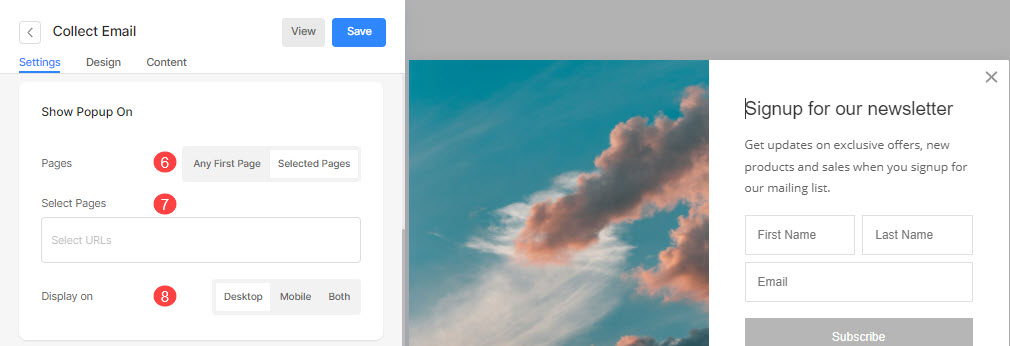
- Click on the Settings (1) option to manage the Settings of the Popup.
- Specify the Name (2) of the popup.
- Set the Status (3) of the popup.
- Published – Show the popup on the website.
- Scheduled – Schedule a popup to start and end at a certain date and time.
- Inactive – Set the status of the popup as inactive.
- Select the Start Date (4) of the scheduled popup.
- Select the End Date (5) for the scheduled popup.

Show Popup On
- Show the popup on the First page of the website or on Selected pages (6) only.
- Choose the selected pages (7) where you want to show the popup if you have selected to show the popup on specific pages.
- Set the Display (8) of the popup to be shown on Desktop, Mobile, or both.
When to Show Popup
- Set the Timing (9) of the popup to show up.
- On Landing – When the user visits the page.
- After Page Scroll – Set the page scroll percentage at 25% or 50% page scroll. And the popup will be shown after the specified percentage scrolling.
- After Time Spent on Page – Choose the time spent from 5 sec, 10 sec, or 30 sec on the page. The popup will be shown once the specified time is spent by the visitor.
- On Exit – This will work only on the desktop when the user is going to close the page through mouse hover.
- Set the frequency/when you want to show the popup again (10) on visiting the website.
- Save (11) your changes.

Manage Popup Design
The design of the Email and Call To Action Popup are the same. Here you will see the following options:
Layout
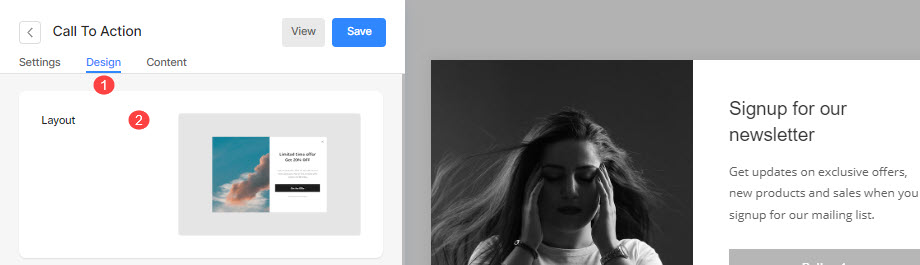
- Click on the Design (1) tab to manage the style of the popup.
- Choose the layout (2) of the popup.
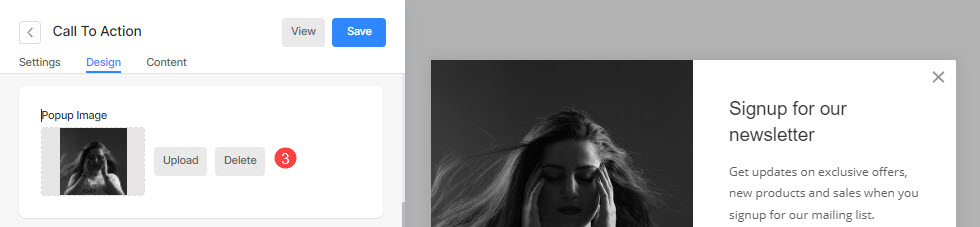
Popup Image
- Add an image (3) for the popup. Click on the delete button to remove it.
Colors
- Set the popup base (4) color.
- Set the overlay background (5) color and opacity.
- Set the headline color (6) for the popup.
- Set the description color (7) of the popup.
- Set the close icon color (8).
- Save (9) your changes.

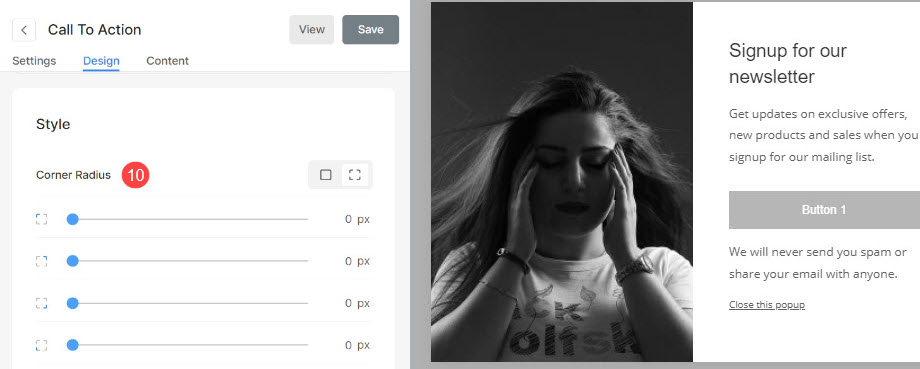
Style Option
- Choose to have a common Corner Radius (10) for all the corners or a different corner radius for each corner of the popup (specified in pixels).
Shadow
- Display: Choose to show the shadow always behind the popup or on hover only.
- Style: Choose from existing presets or create a custom shadow.
In case you have chosen the Custom option, then visit this Box Shadow Generator to create a custom shadow. Finally, copy and paste the box shadow CSS. - In case you have chosen the presets option, then Choose Shadow Styles from the dropdown.
- Save the changes.

Manage Popup Content
Call To Action Popup
- Click on the Content (1) tab to manage the content of your Popup.
- Add a Headline (2) to your popup and enable the toggle to show the title in the popup.
- Add Description (3) to your popup and enable the toggle to show the text in the popup.
- Add Disclaimer Text (4) to your popup and enable the toggle to show the subtext in the popup.

- Add a Dismiss text (5) to your popup and enable the toggle to show the dismiss text in the popup.
- Enable the Close Icon (6) for the Popup.

- Enable the toggle to show Button 1 (7) in the popup.
- Specify Button 1 Label (8).
- Specify Button 1 Link (9).
- Set the target window for the link to be the same window or a new tab (10).
- Invert (11) the Button 1 color.
- Enable the toggle to show Button 2 (12) and customize it.
- Save (13) your changes.

Collect Email Popup
- Click on the Content (1) option to manage the content of your popup.
- Add a Headline (2) to your popup and enable the toggle to show the title in the popup.
- Add Description (3) to your popup and enable the toggle to show the text in the popup.
- Add Disclaimer Text (4) to your popup and enable the toggle to show the subtext in the popup.

- Add a Dismiss text (5) to your popup and enable the toggle to show the dismiss text in the popup.
- Enable the close icon (6) for the popup.

- Enable the toggle and specify placeholder text for Visitor’s Name (7).
- Specify Email placeholder (8) text.
- Specify Button Label (9).
- Invert (10) the button color.

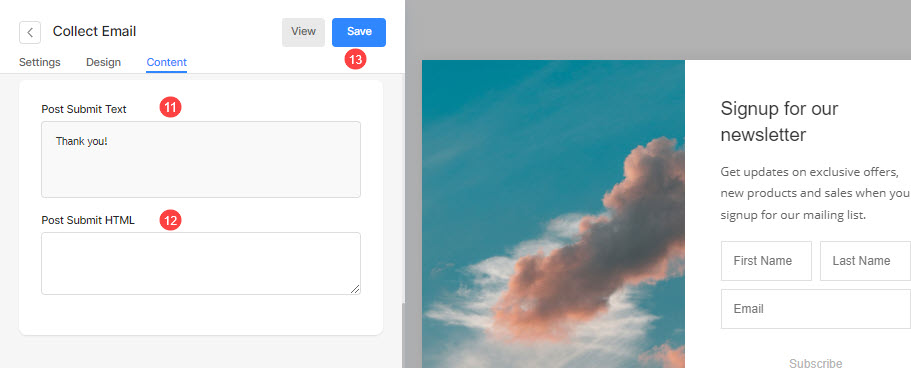
- Specify Post Submit (11) text for the popup.
- Add any script in the Post Submit HTML (12) to show it after the popup submission.
- Save (13) your changes.
Export Emails
Once you have added the popups on the Marketing Popups page, you can view:
- Name (1) of all your popups.
- Status (2) of the popups.
- Start Date (3) of the popup.
- End Date (4) of the popup.
- The number of emails (5) captured in the popup.
- Click on the 3 horizontal dots for the Actions (6).
- Click to edit (7) the popup.
- Delete (8) the popup.
- Export (9) all the captured emails in the popup.
- Reset the visibility (10) of the popup.
