Pages let you create any kind of information-based page using 100+ content blocks with Pixpa’s easy drag-and-drop page builder.
You can organize, edit and customize these content blocks to create unique pages to show your content.
Also check: Understanding sections and snippets.
In the page builder, you can easily add sections and drag-and-drop snippets from the left sidebar onto the page canvas area.
After placing a section on your page, you can edit individual snippet items (text, images, buttons) in it.
Simply move your cursor on the page canvas area, all individual snippets will be highlighted on mouse hover. Then, click on any snippet to edit the same.
See how to edit the content in action:
Here’s what you can do in the page canvas area:
-
- Sequence the snippets.
- Duplicate the snippets.
- Delete a specific snippet.
- Undo the recent changes.
- Apply bold/italic/underline and other formatting to the text.
- Change the text color and snippet background color.
- Apply the text formatting or change the font style.
- Change the text alignment.
- Create ordered and unordered lists.
- Apply a hyperlink to the text.
- Add a symbol.
- Remove pre-text formatting.
Snippet Tool Box and Editing Tool Bar
On clicking on any snippet, you would see the Snippet Tool Box of the individual snippet on the right side and the Editing Tool Bar on the top.
There are 4 options in the snippet toolbar:
- Drag ( ✥ ) – Used to sequence the snippets by drag and drop.
- Duplicate – Used to duplicate the snippet.
- Element Tools – Used to view the add new snippet, duplicate a snippet, move snippet up/down, and delete option of an individual snippet.
- Delete – Used to delete the snippet.

1. Sequencing the Snippets
- You can sequence your snippet by drag and drop. Just hold the drag icon and drag the snippet across all the blocks on a page and drop it at the desired position.
See sequencing snippets in action:
2. Duplicate your Snippet
- You can duplicate any existing snippet by clicking on the duplicate icon.
See duplicating snippets in action:
3. Delete your Snippet
- You can delete any snippet from your page by clicking on the delete icon.
See deleting snippets in action:
4. Undo the recent changes
- You can undo the recent text-based changes by pressing Ctrl (windows) or ⌘ (mac) + Z.
5. Bold / Italic / Underline / Strikethrough etc
- You can easily edit your snippet text by clicking on it. Just select the text and click on the editing toolbar icon to Bold, Italic, Underline respectively.

See in action:
6. Text color / Text background and Section Background Color
You can select a color for Text and Text Background in two ways:

Palette
Within this tab, the available color options will mirror those of the chosen color palette from the Design section.
They will be automatically fetched and updated whenever you make changes to the color palette for your website. Learn more about Color palettes.
Custom Color
Here, you’ll find a color picker where you can select a color and choose from various available shades.
Additionally, you can input a Hex color code and also fine-tune the Opacity of the color.
Follow the steps mentioned below to select a color for text and text background:
- Click on a particular snippet, select the text and click on the Color (1) icon. You will see a pop-up window where you can choose to select a color from Palette Color options or a Custom Color (2).
- Select a Text Color and Fill Color (3) i.e., the Text Background Color.
- Adjust the Opacity (4) of the color using the slider.
- You can also use enter a Hex Color Code (5) and apply the same to the text / text background.
- Finally, Save (6) the changes.

- The Section Background Color (7) can be changed from the Color Style option.

- You can also change or remove the applied color/styling. Just select the text and click on the Clean Icon (8) to remove the existing color scheme.
- Save (9) the changes.

See in action:
7. Text Font Style
- You can use four different types of font styles on your pages (at a time) which would be specified in the Design section. This is a common design style that’s used across all the pages.
- Header 1 Style → Headline font and style → <h1> tag
- Header 2 Style → Title font and style → <h2> tag
- Header 3 Style → Subtitle font and style → <h3> tag
- Header 4 Style → Subtitle / Bylines font and style → <h4> tag
- Paragraph text Style → Paragraph font and style → <p> tag
- Once you specify the font style in the Design section, you can efficiently use them across the page. Just select the text and apply the formatting in the page editor.
Also Check: Website Text style. - The system will automatically apply the font, color, size, and weight of that particular font style to the selected text. You can review the same on the live site and editor.

See in action:
8. Alignment of the text
- You can manage your snippet text alignment – Left / Center / Right and justify by clicking on the alignment icon in the editing toolbar.
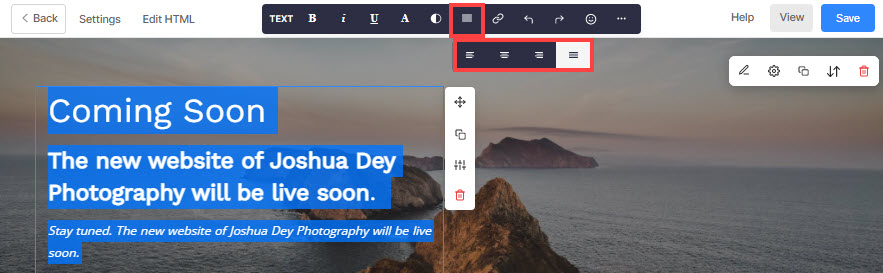
See in action:
9. List – Ordered and Unordered / Indent / Outdent
- You can easily convert your text into lists with indentation and organize them.
- Indent – A highlighted text area will be indented.
- Outdent – A highlighted text area will be un-indented. To outdent, click on the unordered/ordered list icon that you have applied before.
- Unordered list – Highlighted text will be formatted like a bulleted list. In HTML, this uses a set of <ul> and <li> tags.
- Ordered list – Highlighted text will be formatted like a numbered list. In HTML, this uses a set of <ol> and <li> tags.

See in action:
10. Add a link
- You can easily add a link to your text (hyperlink/anchor tag).
- Highlight the text and hit the link button in the editing toolbar. You can connect your existing website pages or any other website/blog/PDFs etc.
- On clicking, you would see a pop-up window where you can enter URL or slug (1), choose whether or not to open in a new window (2), link/button text (3), Title – used in case of images only (4).
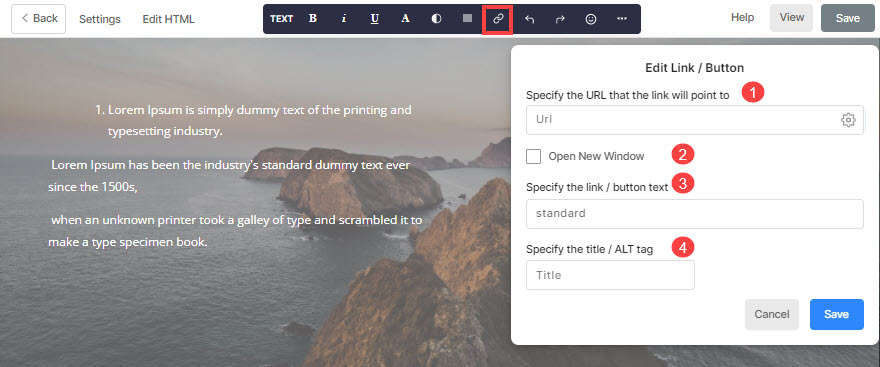
Also Check: Linking text/button.
11. Add a symbol
- You can easily add or replace a symbol (social, art, number, etc) in the page editor.
- Go to any snippet and click where you want to add your new symbol or click on an existing symbol to replace the same.
- Then, click on the Emoji symbol and add the symbols from the right drawer.

See how to add different types of symbols to your page:
12. Remove pre-formatting from the pasted text
- If you copy pre-formatted text directly from Word, Powerpoint, or any internet page, the page editor tends to mess up the text.
- So, you need to remove pre-formatting from your text first so that you can apply the Pixpa font style which is set in the Design section.
- Simply select the entire text of the snippet and hit the clean button.
- It will remove the pre-formatting and apply the paragraph text style to all the text in most cases.
Know more.
