Pixpa offers an inbuilt store platform using which you can easily showcase and sell your images, products, digital download files, or list the services that you offer. The process of building your store is quite easy. You just have to follow some simple steps and start selling on your website.
In this article:
Prerequisites to build your Store
Here are a few things that you need to consider before starting to build your store:
Pixpa Account: With a very user-friendly interface, seamless ecommerce integration and various SEO and marketing tools, Pixpa is all you need to start your online store and sell your products. Click here to create a new account or sign in to an existing account.
Store Structure
Before you start building your online store, take some time to plan and decide the overall structure and layout that best suits your products and brand. You may consider the following points in this step:
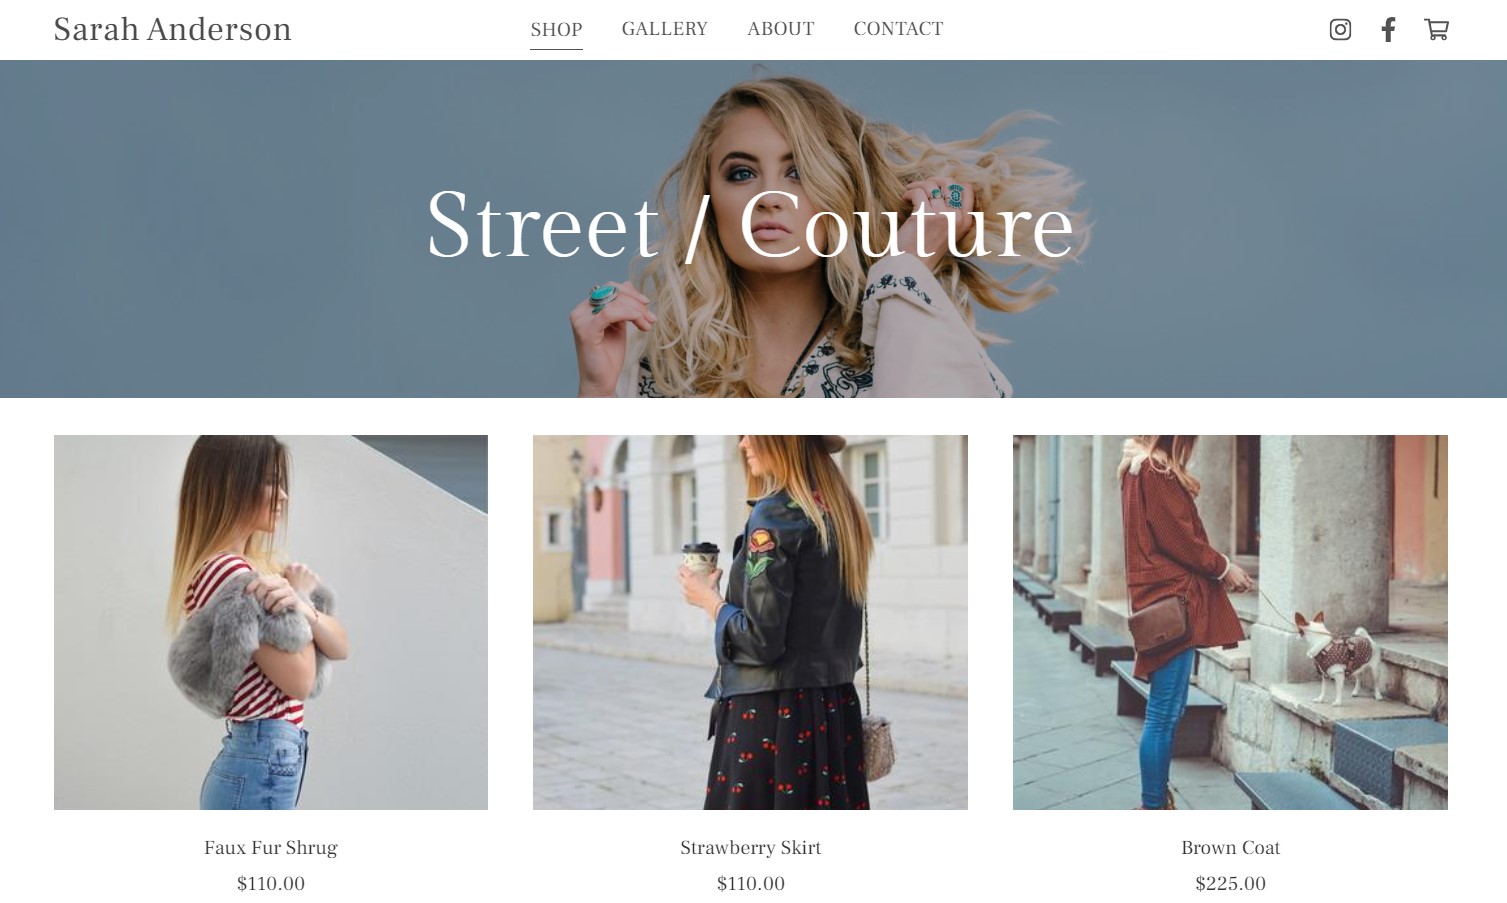
- Landing page: This is typically the first page where customers land on your store. Pixpa provides you with two options to choose from for your storefront. Either you can display all the products or you can list the products category wise.
- Categories: Decide whether you want to categorize your products using categories or not. If yes, how many categories would be required for all the products and the name of categories. Know more.
- Info Section: Info section is useful to display more information in addition to product description. It can be used for multiple products and you can also add multiple info sections. Prepare them if you are going to use them for your products. Learn more.
- Sidebar: Decide whether you are going to use sidebar in your store or not. Learn more about sidebar.
- Banner: You have the option to enable banners on Store pages / Category List page and each of your Product pages. Choose whether you want to use banners or not. Know more about banner.
- Customer Accounts: You can decide whether you want the customers to create an account and login while checkout or they can complete the order as a guest. Know more.
Store Content
Collecting all the data is important as you will have everything ready while building your store.
- Product Title: Prepare the title of products that you will list on the store. It is important to create concise and informative titles that effectively communicate the key details of the product.
- Product images: These are sample images that you upload to display your product on the store. Try to use high quality and visually appealing images for your products. Click here to know more about product images.
- Product description: Prepare the product description as it describes more information about a product. You can also add images in the description. Know more.
- Product options: A product can have multiple variants and options. Prepare all options so that you can easily add them to your store while adding products. Learn more.
- System logo: Design a system logo for your website. It shows up in your order invoices, checkout page, emails, and other relevant pages. Know more.
- Prepare text data: Customize all the text data related to Terms of Use Policy, Order Success, Order Confirmation Email Message and License / Usage Instructions.
Store Design
Pixpa offers a range of styling and customization options to help you create a visually stunning and user friendly online store. Here are a few customizations that you can manage from the Design section of Store.
- Store Pages: Customize the design of your store page from here. You can change the layout of page, number of products to be displayed on the page, manage product listing and sorting, choose how to display images and texts, manage styling of product categories, etc. Learn more.
- Category List Page: From here you can manage the layout of Category listing page, Image and text styling options, mobile display options, etc. Know more.
- Product Pages: These pages display each and every detail of a particular product. From here you can manage the layout of the product detail page, its image and text styling, and several other customization options. Learn more.
- Store Labels: Customize the various status labels of your store. For eg, Sale label, Low on stock label, Coming soon label, etc. Know more.
- Cart Icon: Manage the styling and position of the cart icon on your website. Know more.
- Image Buy Button: Customize the image buy button if you want to sell images using E-commerce galleries. Learn more.
Building your Store
This is the step where you start to build your online store.
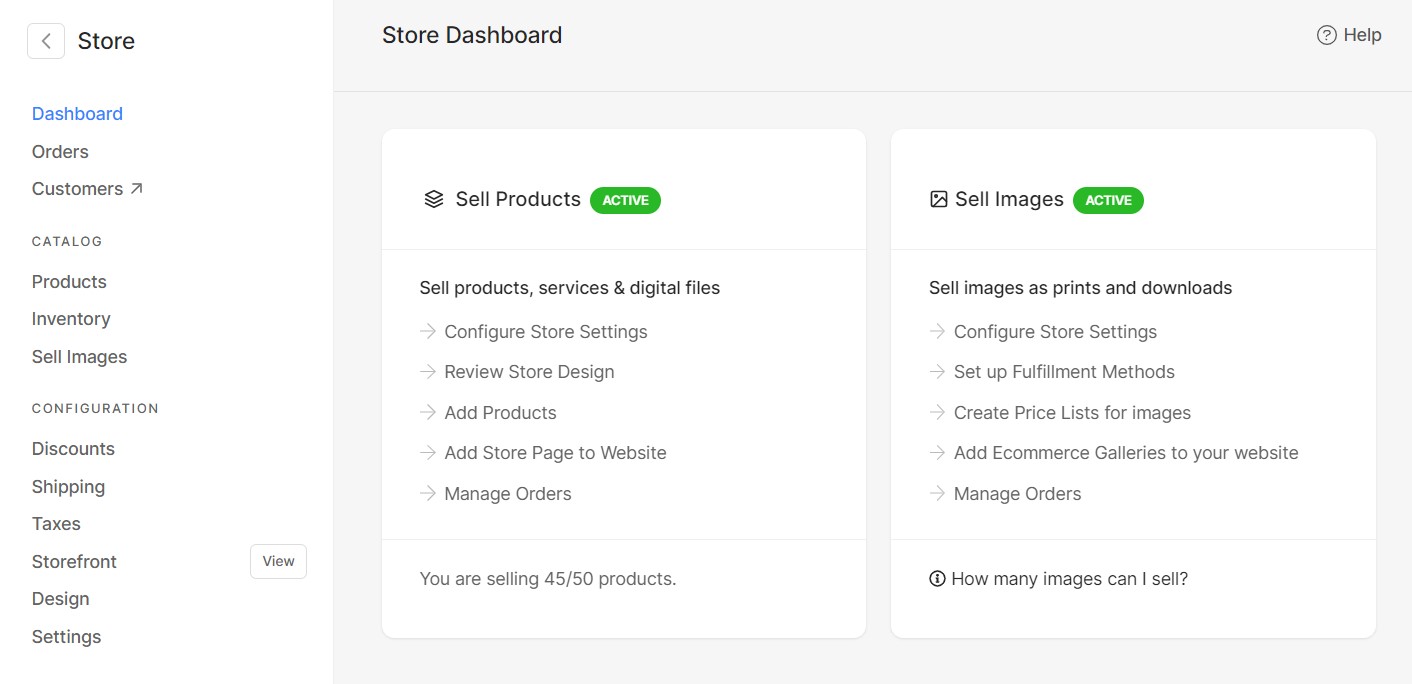
Store Dashboard: This is the front page of store inside the studio. Here you’ll find quick links regarding all the major aspects of your store. Also, you can review the sales using sales graph, view latest product additions and recent orders on your store.
Enable Store: To build your store and start selling, you’ll have to enable “Sell Products” option from the dashboard of Store. You can also enable “Sell Images” option from here if you want to sell images using Ecommerce galleries on your website.
Learn more about enabling store.
Adding your Business details: Add Business Information like business name, email id, address, etc. You can also manage currency, unit of weight, time zone from here. Learn more.
Add Category: You can categorize the products into different categories. Set up categories for your store so that products can be filtered and searched easily by the customers. You can also display your store’s main page as Category listing page. Know more about categories.
Add Info Section: Info section is useful to display more information in addition to product description. It can be used for multiple products and you can also add multiple info sections. Learn more.
Add Product to Store
You need to add products to the store in order to list them on your website’s store page. You can sell three types of products:
- Physical Product: This refers to a tangible item that can be sold. It may include prints, merchandise, artwork, books, etc. To know more about physical products and adding them to store, click here.
- Digital Product: These products are intangible that are stored digitally. They may include images, eBooks, PDFs, video courses, etc. Learn more.
- Services: You can list and showcase the services that you offer through your Pixpa website. This may include photography sessions, consultations, event planning, etc. Click here to learn more about services.
While adding / editing a product, you get several options like pricing of the product, visibility status, inventory management, info section, categories and tags, etc. To learn everything about adding and customizing the products, click here.
Manage Inventory: Manage the inventory of your products and their variants from here. You can update the availability and quantity of the products. You can also update the inventory in bulk by selecting multiple products. Know more.
Add Shipping
Adding shipping carefully is a key step in building your store online. Set up shipping according to your preferred shipping rates and regions. Following are the points that must be taken care of while adding shipping:
- Add countries where you will ship your products. For selected countries (USA, Canada, India, and Australia), you have the option to set up the shipping region for different states as well. You can add multiple countries to your shipping.
- Choose the shipping rate that you are going to use. Pixpa provides you with six different shipping rates: Flat Rate, Free Shipping, Rate based on Order Weight, Rate based on Order Total Amount, Rate based on Number of Items and Store Pickup. You can add multiple shipping rates to one region.
- For different shipping rates, specify the range carefully. For example, if you sell heavy products, specify the weight range and shipping rate. You can add multiple ranges.
- You have the option to enable free shipping for all orders or you can specify certain conditions regarding the order’s total value and weight.
- You can create discount coupons for free shipping and share the same to your customers.
Click here to learn more about shipping.
Add Taxes: Create tax rates country wise using this option. You can select if the pricing of a product is inclusive or exclusive of taxes. You can also choose whether the tax is applied to Shipping, Digital Download, Services or all. Learn more.
For countries like USA, Canada, India, and Australia, you can differentiate the tax rates state wise also.
Add Discounts: If needed, you can set up discount coupons for your customers. They can use them while making purchases. You can specify the expiry and limit the use of coupons.
Pixpa provides you with the option to create three types of discount coupons: Percentage discount, Flat Amount discount and Free Shipping. Click here to know more.
Fulfillment methods
As you receive orders from your customers, you need to fulfil them. Based on the products present in order, a few products may be automatically fulfilled and a few of them may need you to fulfil.
Pixpa provides you with four different options for fulfilling the orders – Self Fulfillment, Print Vendor Fulfillment, WHCC Lab Fulfillment and Digital Downloads. Set up fulfillment methods according to your choice and preferences. Learn more.
Sell Images using store
You can add ecommerce enabled galleries to your Pixpa website by turning on “Sell Images” option from the dashboard of the store. Using ecommerce galleries, you can easily sell images as prints and digital downloads. Know more.
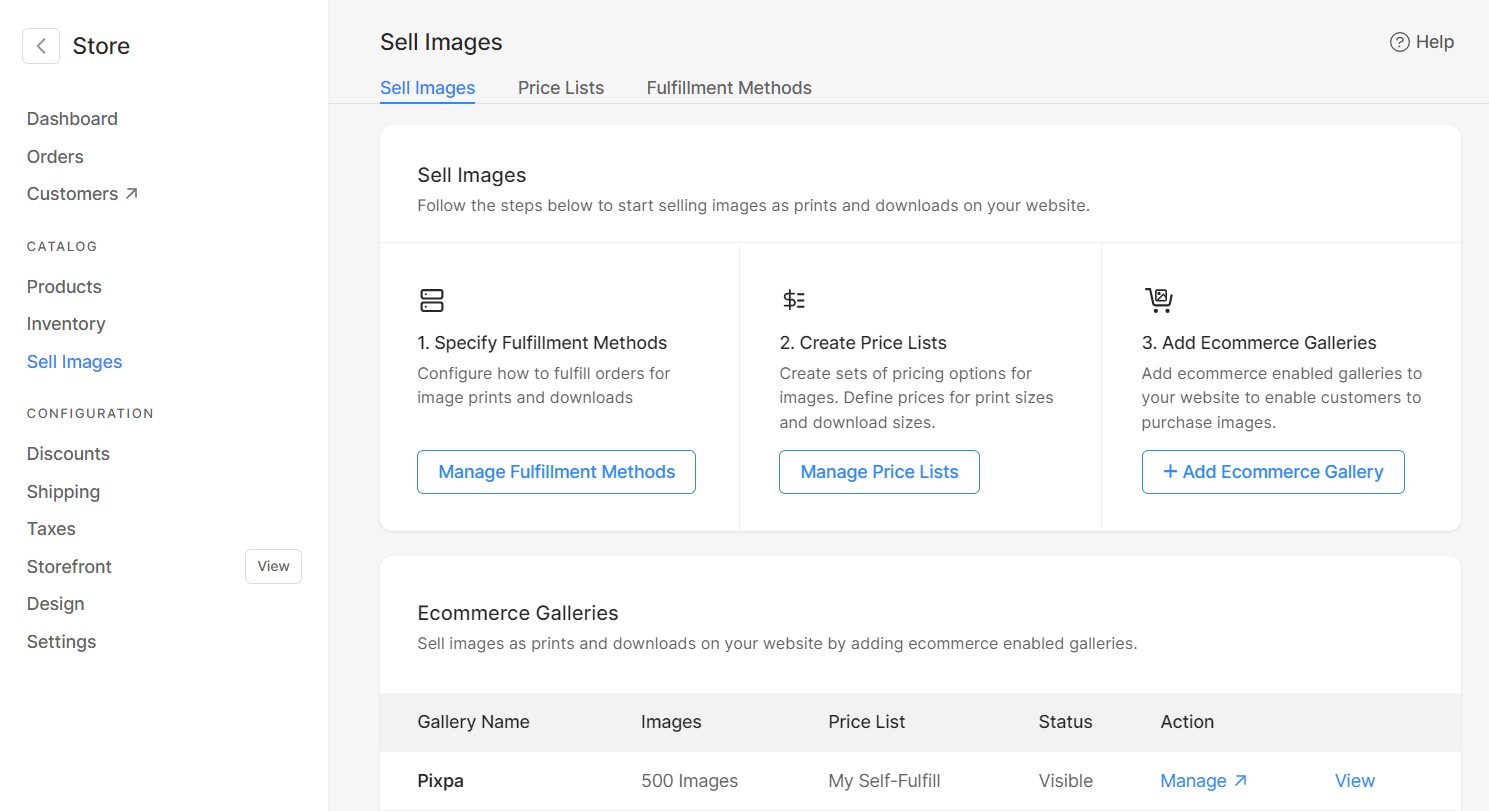
You need to follow some simple steps to setup ecommerce store and start selling:
- Create Price Lists for Images: You need to create price lists for the images to sell them. Setting up a price list involves Adding Categories and Adding price list & product options.
- Add E-commerce Galleries to your Website: Adding ecommerce enabled galleries on your website’s navigation menu is a necessary step. This way your customers can easily navigate to the galleries and start making purchases. Click here to know more about adding ecommerce galleries to your website.
- Managing Orders: Here you will see all the orders placed on your ecommerce galleries. You can see the details of orders, sales charts, manage payment status and fulfillment status, export orders as CSV files, etc. Learn more.
To know more about different ways to sell images from Pixpa, click here.
Storefront Page: Set up the front page of your store where customers will land first. You can choose to display the list of all your products or structure them category wise.
You can also manage styling of your storefront page and several other settings like adding banner, featured image, storefront SEO settings, etc. Know more about storefront page.
Sidebar: You can enable sidebar on your website’s Store pages, Product pages and Category List pages. Using sidebar, you can exhibit the categories, search box, latest products, your Instagram feed, social icons, and many other content items.
You can also create your own content block wherein you can add an image, headline, and link it to any (internal / external) page. Learn more about sidebar.
Add Store page to your website: To display products, you need to add store page on your website. It will be incorporated into your website menu. Click here to know how to add a store page to your website.
Checkout Customizations: Manage options like Checkout page fields, Abandoned Carts, Store Policies, Order Success Message and Mail, etc. from here. Choose whether you want your customers to create an account and login while checking out or not.
You can also set a minimum order amount, remove certain fields from the checkout page and reject orders based on keywords in address. Learn more.
Connect Payment Gateways: Set up your payment methods to accept payments from customers. Supported payment methods are Stripe and PayPal. You can accept offline payments as well. PayUMoney is also supported for Indian customers only.
To know more, click here.
Store Checklist
After building your store, it is very important to go through a comprehensive checklist before launching it online to make sure that everything is in order.
Checking store / Checkout flow: Make sure all the products that you want are listed properly with all related contents like images, prices, their weight (if required), inventory, etc.
Also, place an order to go through the entire process of purchasing as a customer. Check if the products are added to the cart correctly, check-out process is smooth, and if the payments are processed successfully.
Check SEO content of products / Categories / Storefront page: Make sure that SEO data like title, description, page URL, etc. are added to every product, categories and storefront page. Also, make a check that they are searchable by search engines.
Terms of Use / Order Success Message / Mail: Check that “Terms of Use” text has been added to your store’s checkout page. Also, make sure you have customized the success message and confirmation email according to your preferences. This is what your customers will receive immediately after placing an order.
Tax / Shipping / Discount application: Make sure you have created the Shipping rates and region correctly. Also verify that the Tax Rates have been added. If needed, you can create discount coupons for your customers too.
Order fulfillment
Once you have received your order, you need to review the same and process the order to deliver the products to your customers.
Checking order: Here you will see all the orders placed on store along with the sales graph which you can filter to view the orders of a specific period. You can export orders as CSV files.
You can also view all the details of a particular order for eg, name, email, address, contact number, download invoice as PDF, export that particular order as CSV, etc. Know more.
Fulfilling the order
Physical products need to be fulfilled from your end. Digital download links are generated instantly as the payment is received on the website.
If you are selling images using E-commerce galleries, following are the fulfilment methods that you can use:
- Self Fulfilment: You will have to manage the process of fulfilling the order in this. You can use any print lab of your choice. Here, you will be responsible for printing and shipping the order items to your customers. Learn more.
- Print Vendor Fulfillment: Pixpa supports self-fulfillment where you can fulfil your orders using any lab of your choice. To automate self-fulfillment, you need to set up your custom lab. Know more.
- WHCC Lab Fulfillment: Pixpa has integrated White House Custom Color (WHCC) lab that you can use for the fulfilment of your orders. Learn more.
Payment Status: Manage the status of payment for the order. You have three options – Unpaid, Paid and Refunded. Learn more.
Fulfillment Status: Manage the fulfillment for the order. You have five options regarding fulfilment of the order – Processed, Shipped, On-Hold, Fulfilled and Cancelled. Learn more.
Order History: Order history can be seen from the particular order page. The order history consists of all the changes that were applied to the order, the date and time when the status was changed, and the note written while changing the status of the order. Learn more.