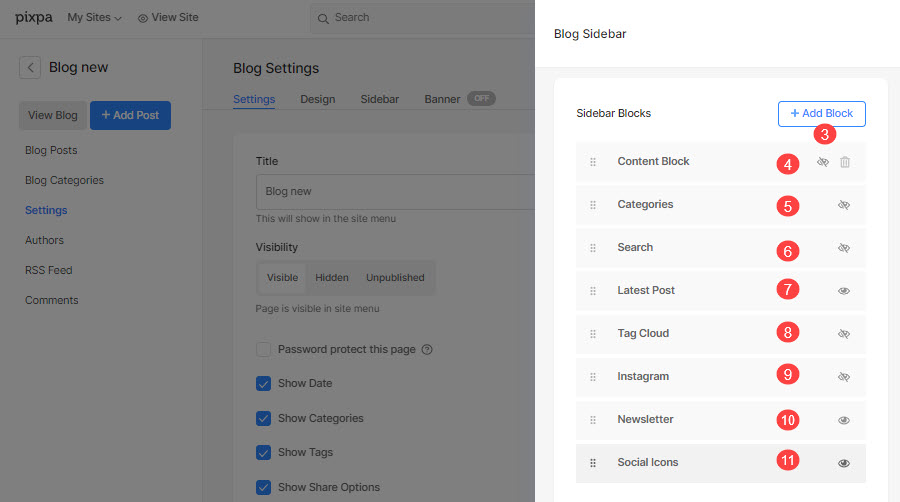
Use a sidebar to add a column on the right or left-hand side of the primary content area and display info such as recent posts, ads, newsletter subscription requests, etc. Using it, you can display several types of content.
This sidebar can only be added to your blog listing page or blog post page or both. The blocks of the sidebar will be stacked vertically. However, you can drag and drop them to rearrange.
Add a sidebar to your blog:
- Go to the Website section in the studio and click on the Blog.

- Click on the Settings option from the left panel.
- Click on the Sidebar tab under Blog Settings. You’ll now see a drawer on the right-hand side with the heading ‘Blog Sidebar’.
Now, you can choose where you want to show the sidebar.
- Show Sidebar on – Select where you would like to show the sidebar (in the blog listing page, blog post page, both or none).
- Position – Select whether you want to show the sidebar on the left or right-hand side of the page.

By default, we have a few content blocks that you can edit and add right away:
- + Add Block – Add a new content block.
- Content Block – Edit the content block. Using the content block, you can add any text and image to the sidebar.
- Categories – Display a list of all blog categories in your sidebar. Click on any category to view all the blog posts associated with that category.
- Search – Add a search box that can be used to find your blog posts.
- Latest Post – Display the latest posts in your sidebar.
- Tag Cloud – Display the tag cloud in your sidebar. Click on any tag to view all the blog posts associated with that tag.
- Instagram – Display your Instagram feed in your sidebar.
- Newsletter – Add a newsletter and capture visitors’ email addresses to send them newsletters.
- Social Icons – Display your social icons in the sidebar.

Here’s a demo sidebar on a blog post page.
